
Quick answer
From local FastAPI project to live URL.
Create a virtual environment, install requirements.txt, and run python -m uvicorn main:app locally. ZIP main.py, requirements.txt, application modules, and static/templates while excluding the virtual environment, caches, secrets, and local databases.
What the Free plan includes.
Sitedropper Free is a $0 plan for a small real deployment workflow. The dashboard is the source of truth for the current ZIP limit shown beside Choose ZIP.
- Up to 3 projects
- 30 deployments per month
- Draft, Password protected, and Public sharing
- Sitedropper URL
Before you build.
FastAPI does not create a static build folder. Validate the exact main.py:app import and run Uvicorn locally before packaging source.
- fastapi and uvicorn declared in requirements.txt.
- main.py containing an app object.
- A route such as / or /health for deployment checks.
- No startup dependency on local SQLite, uploads, or background worker processes.
Build and check FastAPI locally.
Run these commands from the project root. Finish the local check before creating the archive so the deployment is not the first place a dependency, compile, or startup error appears.
The final server command stays running. Open the local URL in another terminal or browser, complete the checks, then stop it with Ctrl+C.

macOS
Check FastAPI on macOS
Create a disposable virtual environment in Terminal, install the exact requirements, run the framework check, and start the same entry point you plan to upload.
python3 -m venv .venv
. .venv/bin/activate
python -m pip install --upgrade pip
python -m pip install -r requirements.txt
python -m py_compile main.py
python -c "from main import app; print(app.title)"
python -m uvicorn main:app --host 127.0.0.1 --port 8000
Windows
Check FastAPI in PowerShell
Create a disposable virtual environment in PowerShell, install the exact requirements, run the framework check, and start the same entry point you plan to upload.
py -m venv .venv
.\.venv\Scripts\Activate.ps1
python -m pip install --upgrade pip
python -m pip install -r requirements.txt
python -m py_compile main.py
python -c "from main import app; print(app.title)"
python -m uvicorn main:app --host 127.0.0.1 --port 8000
Linux
Check FastAPI on Linux
Create a disposable virtual environment in a terminal, install the exact requirements, run the framework check, and start the same entry point you plan to upload.
python3 -m venv .venv
. .venv/bin/activate
python -m pip install --upgrade pip
python -m pip install -r requirements.txt
python -m py_compile main.py
python -c "from main import app; print(app.title)"
python -m uvicorn main:app --host 127.0.0.1 --port 8000
Use one dependency workflow: keep the lockfile that matches the selected package manager and do not mix install commands.
Create the ZIP on your operating system.
Package reviewed source and build metadata; use the exclusions to keep local-only files out. The Windows and macOS recipes include graphical menu guidance, while the commands remain the precise archive contract.
No command line required
Directly create the ZIP in your file system.
First create and inspect a clean staging folder containing only the required source, manifest, configuration, and entry-point files. In Windows File Explorer, right-click the reviewed selection and choose Compress to → ZIP File. On macOS, Control-click the reviewed selection and choose Compress Items.
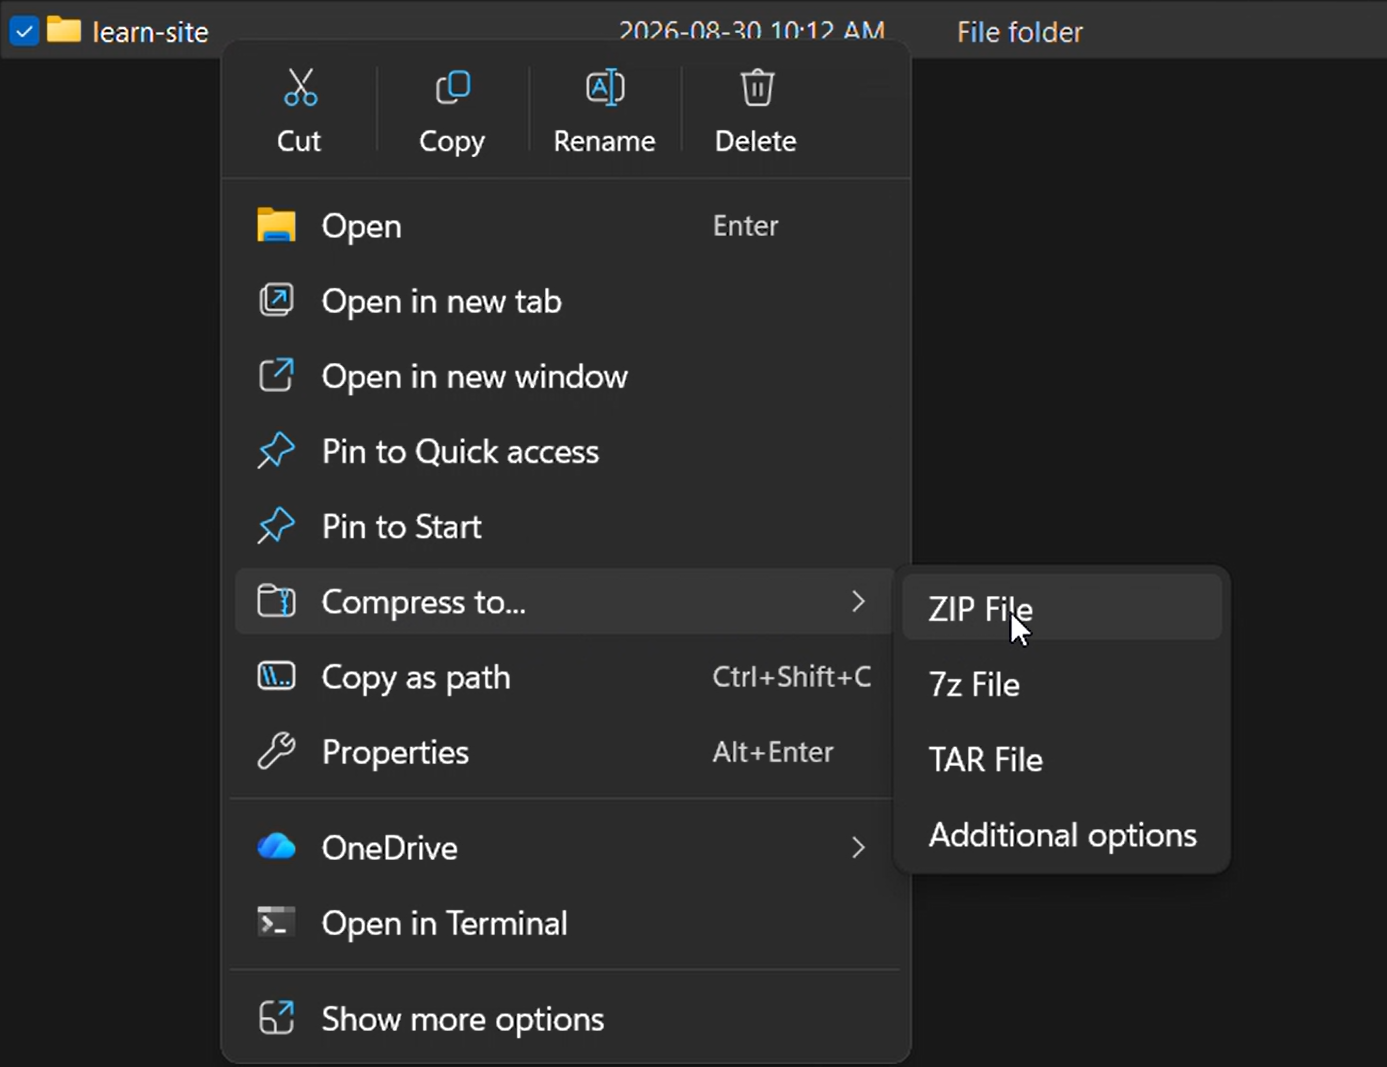
Open the resulting archive before upload. If an outer folder wraps the expected files, recreate the ZIP by selecting the folder’s contents instead.
Or create and inspect the ZIP from the command line.
macOS
Compress the reviewed source in Terminal
The exclusions keep common dependencies, caches, local data, and secrets out. Finder users must first make and inspect an equivalent clean staging folder, then select its contents, Control-click, and choose Compress Items—not compress the raw project folder.
- Run from the project root.
- Inspect project-specific local files before upload.
- Confirm the manifest, lockfile or requirements, source, and entry point are present.
if [ -e site.zip ]; then echo "site.zip already exists. Move or rename it before continuing." >&2; exit 1; fi
zip -qr site.zip . -x ".venv/*" "venv/*" "node_modules/*" ".git/*" ".next/*" "dist/*" "build/*" ".cache/*" ".turbo/*" "__pycache__/*" "*/__pycache__/*" "*.py[cod]" ".pytest_cache/*" ".mypy_cache/*" ".env" ".env.*" "*/.env" "*/.env.*" ".npmrc" "*/.npmrc" "*.sqlite" "*.sqlite3" "db.sqlite3" "*.log" ".DS_Store" "*/.DS_Store" "site.zip" ".sitedropper-package/*"
unzip -l site.zip | head -60
Windows
Stage and compress the source in PowerShell
A clean staging folder prevents dependencies, caches, local databases, and secrets from entering the ZIP. For File Explorer, stop after robocopy, inspect the staging contents, select them, right-click, and choose Compress to → ZIP File; never compress the unreviewed project folder.
- Run from the folder containing the manifest or requirements.txt.
- Review the staging folder created beside the project before upload.
- The command intentionally leaves the staging folder in place and never deletes it automatically.
$ProjectRoot = (Resolve-Path .).Path
$ProjectName = Split-Path $ProjectRoot -Leaf
$Stage = Join-Path (Split-Path $ProjectRoot -Parent) "$ProjectName-sitedropper-package"
if (Test-Path $Stage) { throw "$Stage already exists. Move or rename it before continuing." }
if (Test-Path .\site.zip) { throw "site.zip already exists. Move or rename it before continuing." }
robocopy $ProjectRoot $Stage /E /XD .venv venv node_modules .git .next dist build .cache .turbo __pycache__ .pytest_cache .mypy_cache .sitedropper-package /XF .env .env.* .npmrc site.zip *.pyc *.pyo *.sqlite *.sqlite3 db.sqlite3 *.log
if ($LASTEXITCODE -ge 8) { throw "robocopy failed with exit code $LASTEXITCODE" }
Add-Type -AssemblyName System.IO.Compression.FileSystem
$Archive = Join-Path $ProjectRoot "site.zip"
[System.IO.Compression.ZipFile]::CreateFromDirectory($Stage, $Archive)
tar.exe -tf .\site.zip
Linux
Compress the reviewed source in a Linux terminal
The exclusions keep common dependencies, caches, local data, and secrets out. Install your distribution’s zip package first if needed.
- Run from the project root.
- Inspect project-specific local files before upload.
- Confirm the manifest, lockfile or requirements, source, and entry point are present.
if [ -e site.zip ]; then echo "site.zip already exists. Move or rename it before continuing." >&2; exit 1; fi
zip -qr site.zip . -x ".venv/*" "venv/*" "node_modules/*" ".git/*" ".next/*" "dist/*" "build/*" ".cache/*" ".turbo/*" "__pycache__/*" "*/__pycache__/*" "*.py[cod]" ".pytest_cache/*" ".mypy_cache/*" ".env" ".env.*" "*/.env" "*/.env.*" ".npmrc" "*/.npmrc" "*.sqlite" "*.sqlite3" "db.sqlite3" "*.log" ".DS_Store" "*/.DS_Store" "site.zip" ".sitedropper-package/*"
unzip -l site.zip | head -60
Inspect before upload: compare the ZIP listing with the archive tree below and remove dependencies, caches, local data, and secrets.
Check the archive root.
The current automatic start command targets main:app. Use an existing Dockerfile when a project must keep another module/object convention.
site.zip
├── requirements.txt
├── main.py
├── application modules/
├── templates/ (when used)
└── static/ (when used)
Upload the FastAPI ZIP to Sitedropper.
Create a Draft project, upload site.zip, follow the deployment, and open the generated URL only after the progress reaches Ready.
The dashboard screenshots use fictional project and account data. Yellow outlines identify the documented controls.
- 01
Create a project
Open Projects, choose New project, enter a name, and select the highlighted Create project action. New projects begin as Draft.
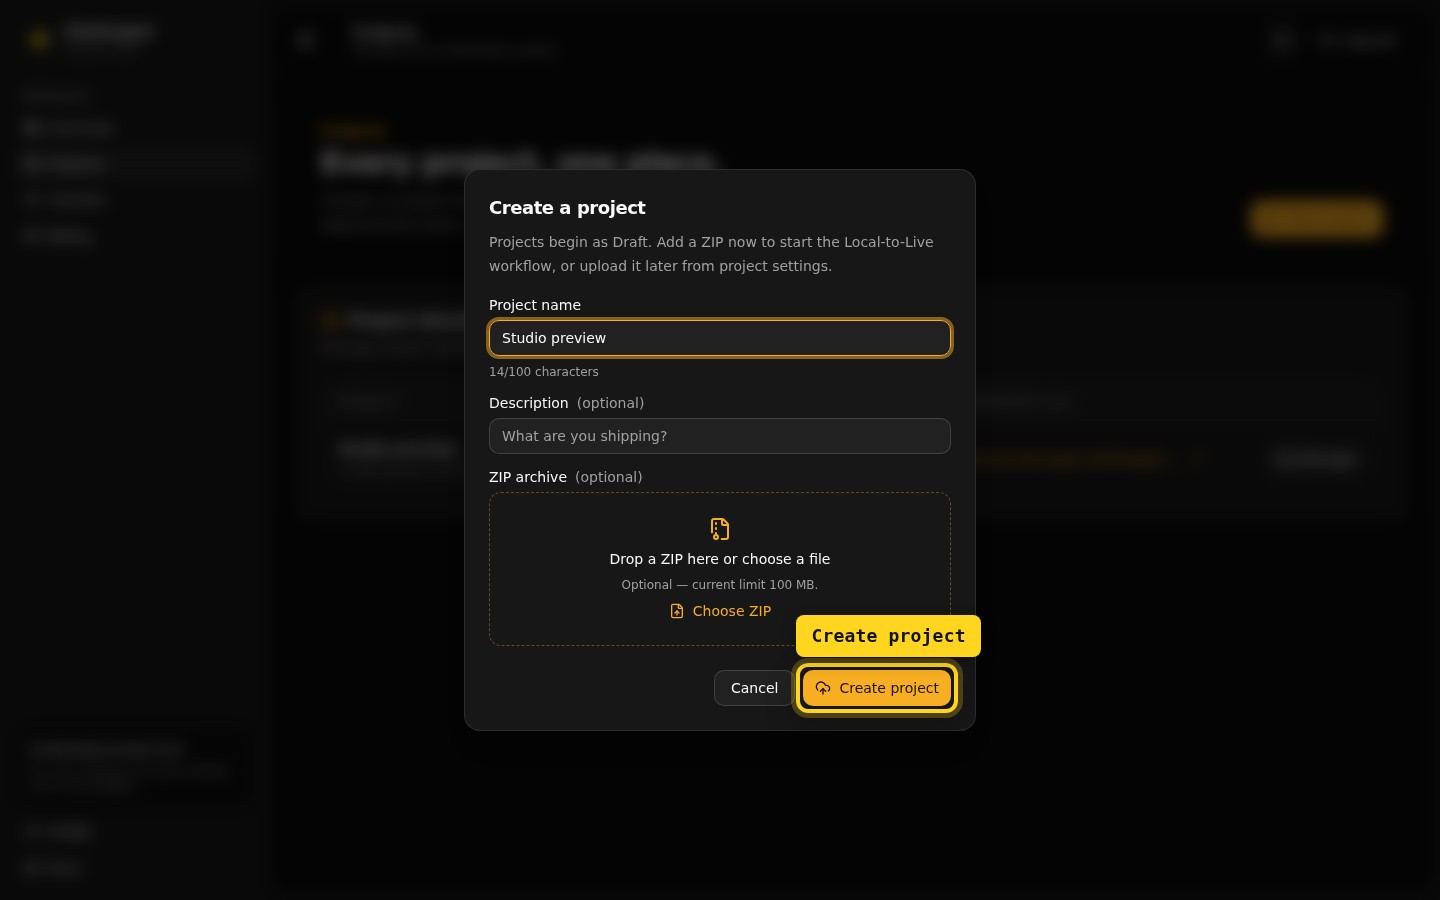
Create a project in the current Sitedropper dashboard. Select the image to enlarge it. - 02
Upload the ZIP
Open the project’s Upload and deploy card, then select the highlighted Choose ZIP control or drop the archive into the same area.
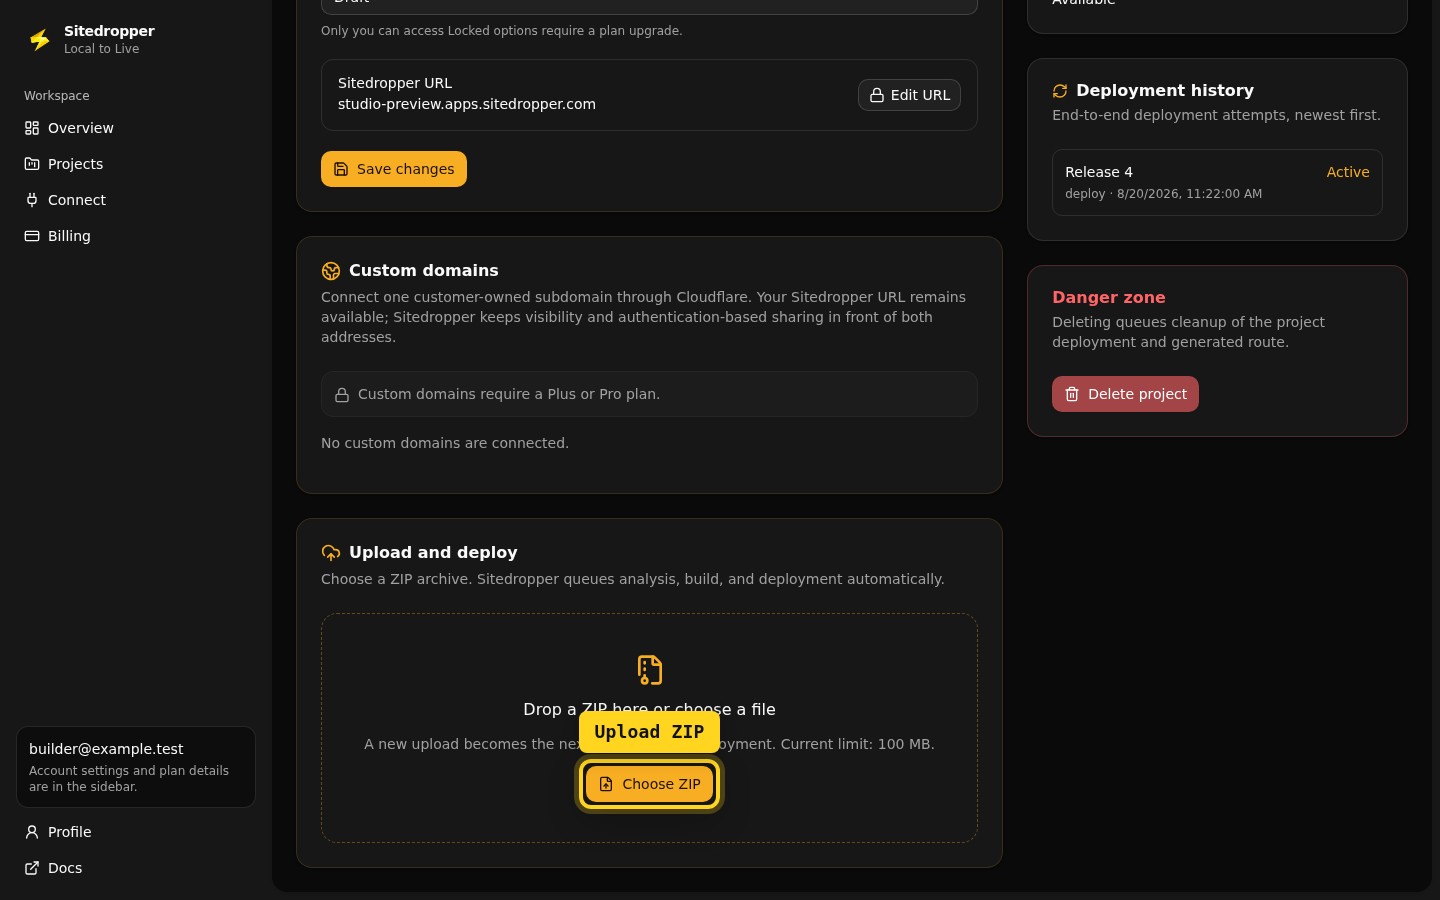
Upload the ZIP in the current Sitedropper dashboard. Select the image to enlarge it. - 03
Open the deployed site
Wait for Analyze, Build, and Deploy to finish. Then use the highlighted Open Sitedropper site action to review the generated URL.
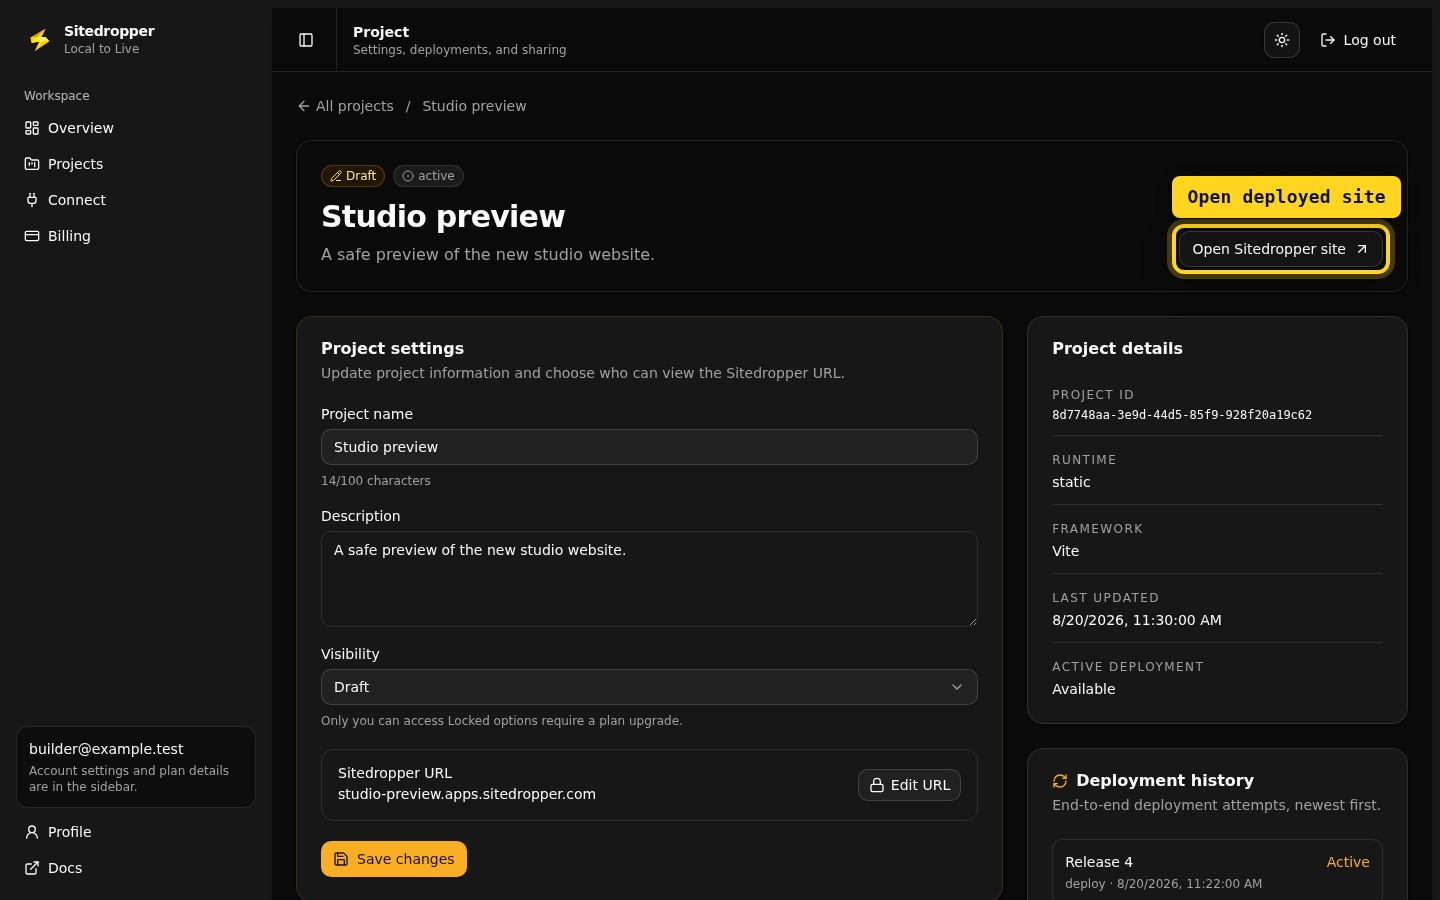
Open the deployed site in the current Sitedropper dashboard. Select the image to enlarge it.
Check the FastAPI result.
Use the deployed URL like a visitor rather than relying only on the successful status.
- Call / or the documented health endpoint.
- Open /docs only when the project intentionally exposes the generated API documentation.
- Exercise one request/response model to catch import or validation issues.
- Confirm no startup event waits for a local database or long-running worker.
Update Sitedropper Project settings.
Project settings are separate from framework configuration. Update the project name or description, keep Draft while reviewing, then choose Password protected or Public only when that matches the intended audience. Free does not include Private sharing by email, URL customization, or custom domains.
The dashboard screenshots use fictional project and account data. In the first settings image, the existing yellow outline marks Open site; the Project settings card is visible below and is identified by the instructions.
- 01
Review Project settings
The Project settings card is below the project header. Update the name or description, review the generated URL, and keep the first deployment Draft while you test it.
Review Project settings in the current Sitedropper dashboard. Select the image to enlarge it. - 02
Choose who can open the site
Open Visibility. Free includes Draft, Password protected, and Public. Select Public only when anonymous access is intentional, then close the menu and choose Save changes.
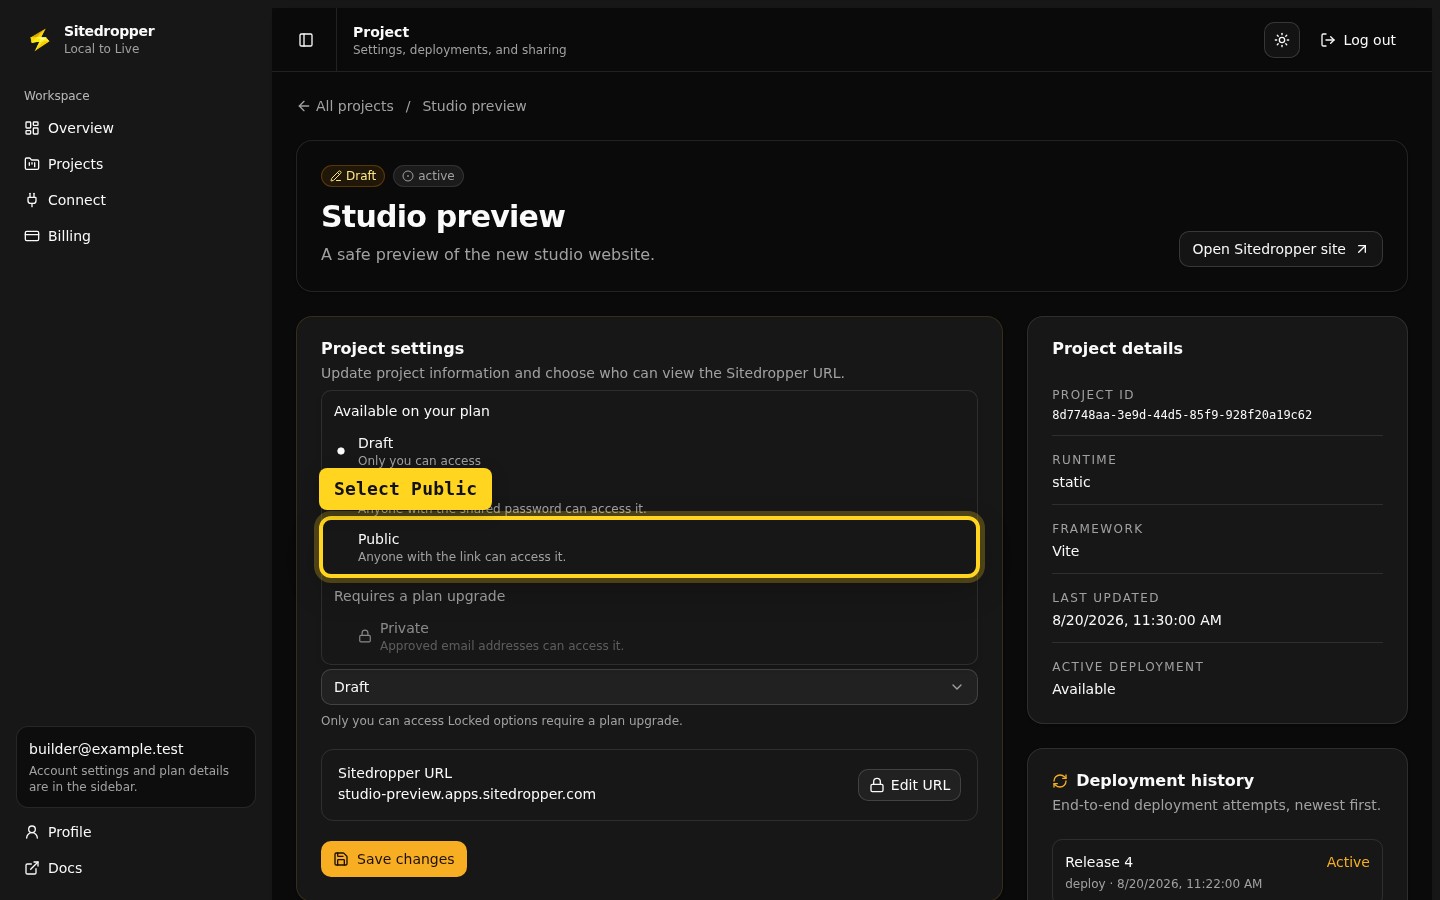
Choose who can open the site in the current Sitedropper dashboard. Select the image to enlarge it.
Finish the change: close the visibility menu, select Save changes, and wait for the “Changes saved” confirmation before leaving the page.
Troubleshoot this FastAPI deployment.
- Uvicorn cannot import main
- Keep main.py at the ZIP root and define app there, or use an existing Dockerfile for another module path.
- Uvicorn is not found
- Add uvicorn to requirements.txt and verify the install in a fresh virtual environment.
- The API starts but a route returns 500
- Check imported settings and dependencies. Do not rely on a local .env or database file excluded from the ZIP.
- Static/templates are missing
- Keep the directories at the relative paths used by the application and verify them in the ZIP listing.
Know the Free-plan boundaries.
- The application must be stateless on its local filesystem.
- Sitedropper does not provide an application database, cron process, or background worker in this ZIP workflow.
- Keep credentials and local environment files out of the archive.
The generated Sitedropper URL remains available on Free. Check the dashboard for current usage and upload limits before starting another deployment.
FastAPI deployment FAQ.
What FastAPI entry point does this ZIP workflow expect?
Use main.py with an app object so the supported automatic command can run main:app.
Should requirements.txt include Uvicorn?
Yes. FastAPI supplies the framework, while Uvicorn runs the ASGI application.
Does Sitedropper Free provide a FastAPI database?
No. Keep the project stateless or use a compatible external service already configured by the application.